

Here's the thing nobody tells you about working on a laptop: the screen is too low. Not by a little. By enough that you spend the day looking down at it, chin tucked and shoulders rolled forward, and then you wonder why your neck aches by mid-afternoon. You don't feel it happen. You just wake up one day with a tight spot between your shoulder blades and a habit of tilting your head back to see the top of the screen. I spent 26 years leaning over patients as a dental hygienist, so I know exactly what that forward-head position does to a body. When I moved to a front desk job three days a week, I figured I was giving my neck a break. Instead I traded one kind of strain for another, because my laptop sat a foot below my eye line and I hunched to meet it.
The fix sounds simple: get the top of the screen close to eye level. The practical part is finding a stand that holds the laptop where you actually need it, and then setting it up so it stays there. After six weeks with the Nulaxy Fully Adjustable Laptop Stand on my spare-bedroom desk, I can walk you through the setup step by step. It took me two tries and one honest look in a mirror to get it right, and I'd rather you skip that part.
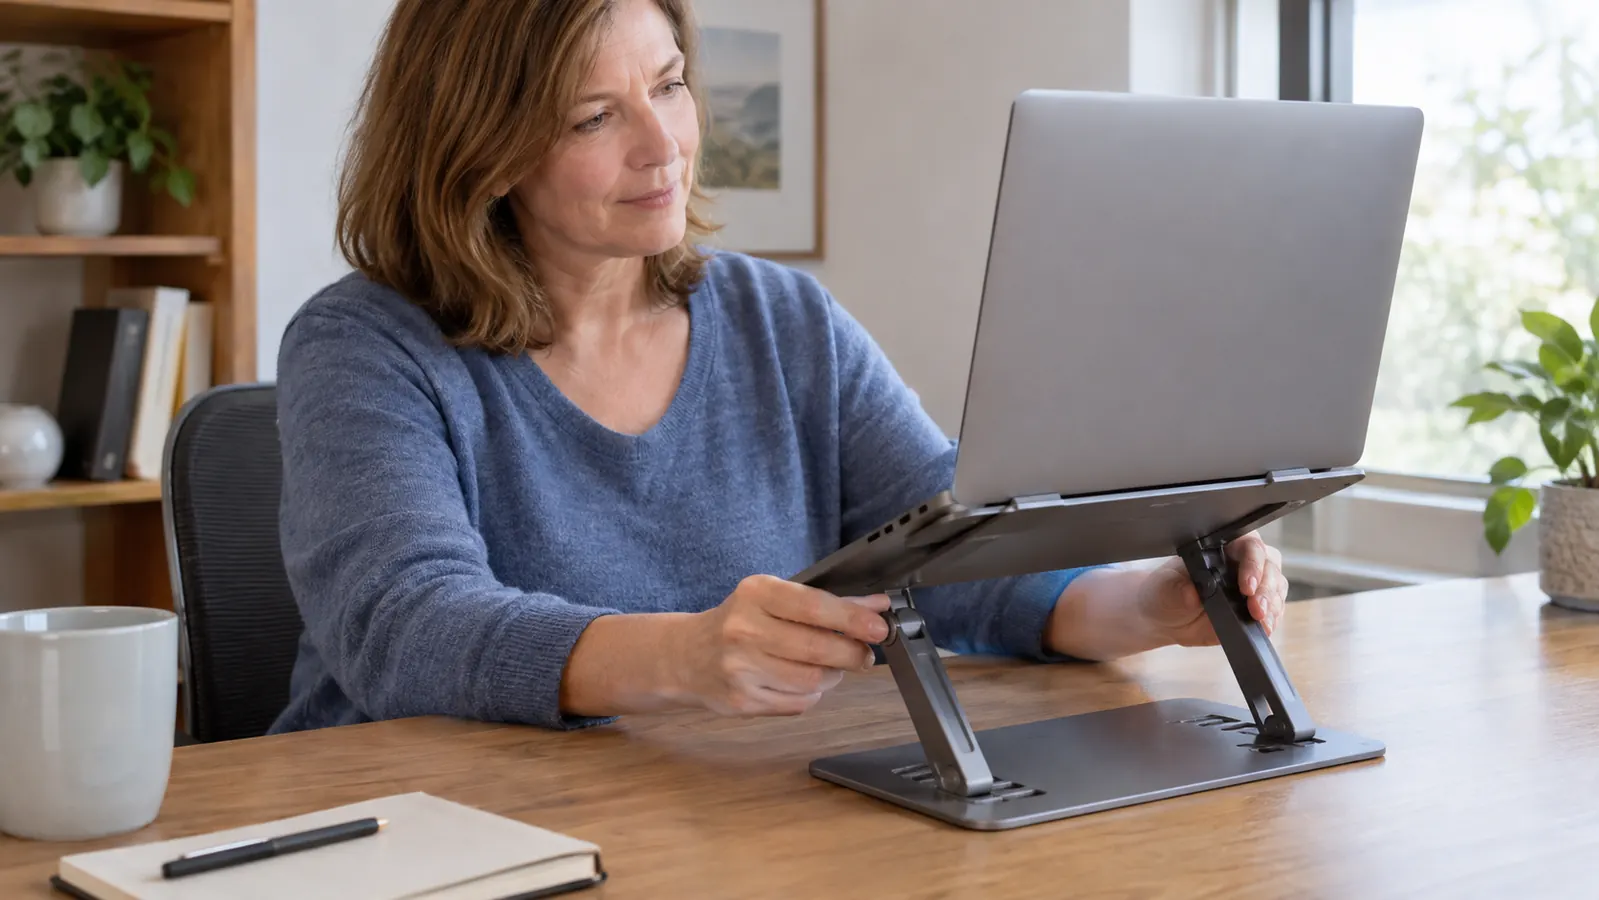
The stand I used for every step in this guide
The Nulaxy Fully Adjustable Laptop Stand raises a laptop through several heights, folds flat when you don't need it, and held my work laptop steady for six weeks. If you want to follow along with the same tool, check today's price on Amazon.
Amazon Check Today's Price on Amazon →The Goal, in One Sentence
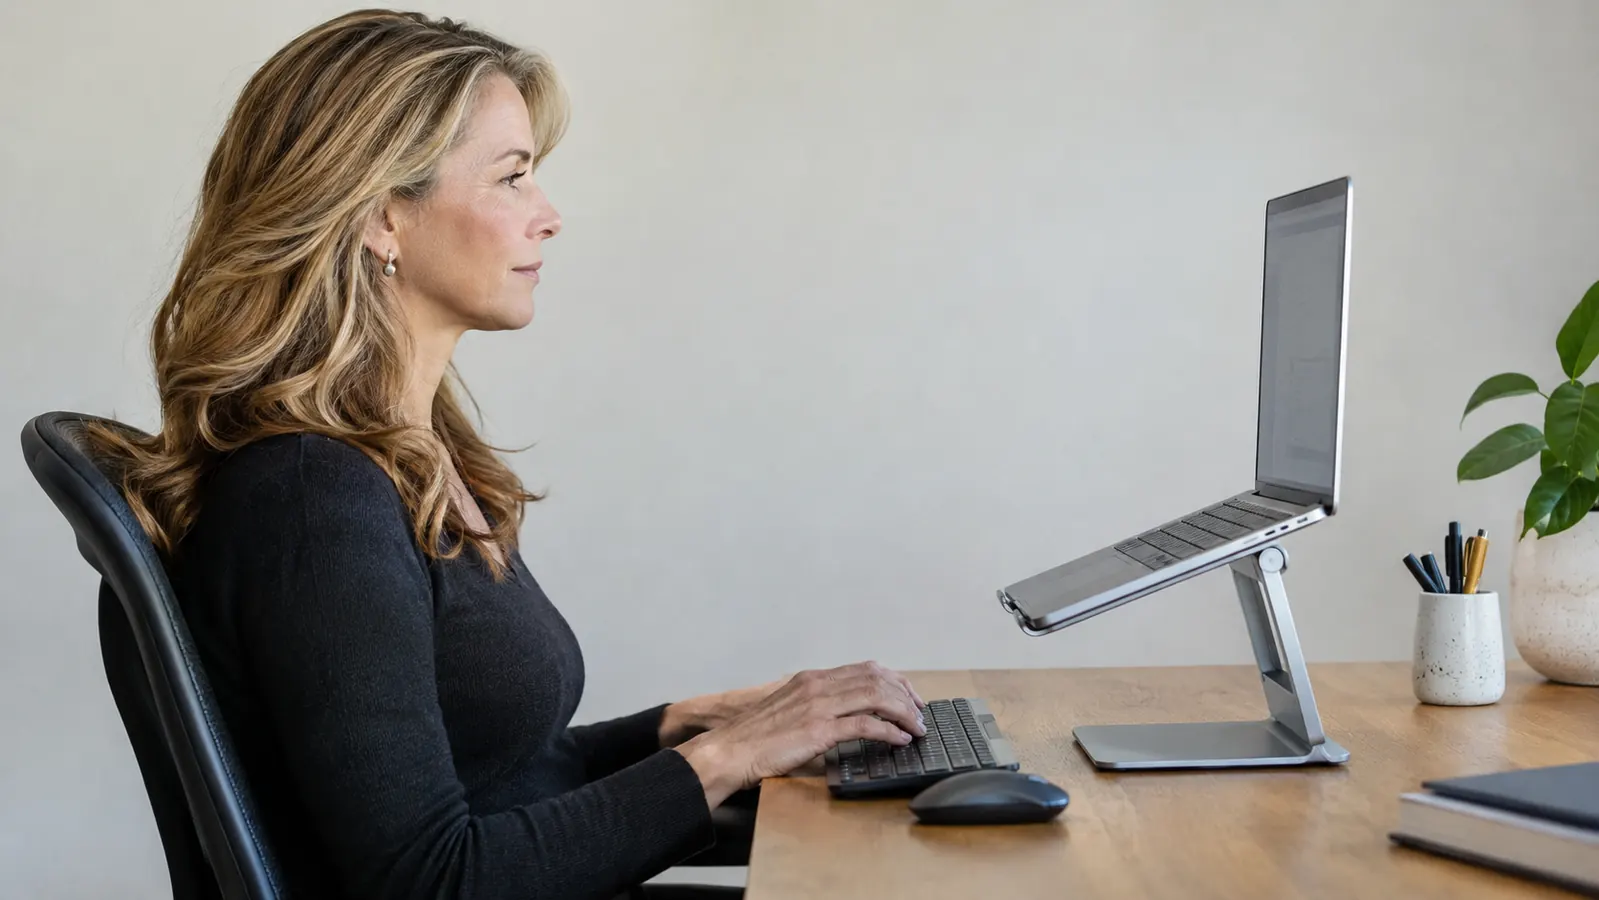
Every step below comes back to one sentence: the top of the screen belongs at eye level, or just below it, so your head can stay level and your shoulders can stay back. That's it. No special equipment, no stretches you have to remember, no app that reminds you to sit up. Just a screen that stops asking your neck to meet it halfway. Everything else in this guide is the practical part of making that sentence true on a normal desk, with a normal chair, in a room that was never designed as an office. I want to be clear about what this guide will and won't do. It won't fix a bad chair, it won't cure an old injury, and it won't make you love sitting at a desk. What it will do is take the screen height out of the equation so your neck isn't doing extra work every single day.
Step 1: Sit the way you actually sit
Before you touch the stand, get into your normal working position. Not the posture you think you should have. The posture you actually hold when you're typing, reading, and paying bills. For me that means my chair at its usual height, my lower back against the chair, my feet flat on the floor, and my shoulders wherever they land after a morning of work. That's the starting point, and it's the only honest one. If you're not sure what your real posture is, have someone take a photo of you working, or set your phone up on a shelf. The photo will not be flattering. It will be accurate, and accurate is what you need.
This matters because the whole setup is relative to your eye line. If you measure from a posture you don't hold, the stand will be wrong the moment you settle back into your real slouch. Sit first. Adjust second. It sounds backwards, but it's the only way the numbers work, and it's the mistake I made the first time I tried to fix my screen height.
One more thing: wear whatever you normally wear to work. If you measure in a posture-perfect moment with your shoulders pinned back, and then spend the day in your usual relaxed position, the screen will sit a little high. Measure from where you live, not from where you wish you lived.
Step 2: Find where your eyes land on the screen
Open the laptop to the angle you normally use and look straight ahead. Your eyes should land on the top third of the screen, roughly at the top edge or just below it. That's the goal: the top of the screen at or slightly below eye level, so you're looking slightly down instead of down and forward. It's a small difference in inches and a large difference in how your neck feels by three in the afternoon.
The most common mistake I see, and the one I made on my first try, is setting the stand so the middle of the screen is at eye level. That puts the top too high and tilts your head back, which trades one neck problem for another. Top third. That's the whole trick, and it's worth repeating because it's the one detail everyone gets backwards.
If you wear progressive lenses like I do, check this from your normal head position, not with your chin lifted to look through the reading part of the glasses. The setup has to work for the way you actually look at the screen. While you're at it, check the distance from your eyes to the screen. A good starting point is an arm's length. If you have to lean in to read, the screen is too far. If it's right in front of your nose, it's too close.
Step 3: Set the stand height, then test it
The Nulaxy stand adjusts through several heights, so start low and work up. Put the laptop on the stand, sit back in your chair, and look at the screen. If your chin is tucked or your head is tilted back, change the height one setting at a time until your neck feels neutral. Give yourself a few seconds at each setting. Your neck will tell you the truth faster than any guide can.
Here's the test I use now: close your eyes, let your neck relax, then open them. Your gaze should land on the top third of the screen without you moving your head. If you have to lift your chin or drop it to find the screen, the stand is at the wrong height. I've done this test in the morning, at noon, and after a long drive, and it gives the same answer every time.
The Nulaxy folds flat when you need to clear the desk, and it held my laptop steady at the setting I chose. I set mine on the second try and haven't touched it since. If you're between two heights, pick the lower one. A screen that sits a touch low is easier on your neck than a screen that sits a touch high, because your head can rest level either way. And because the stand folds flat, it takes up almost no room when you're not using it, which is why it stayed on my desk instead of ending up in a drawer.
Step 4: Fix the keyboard problem
Here's the catch nobody mentions: when the screen goes up, the built-in keyboard goes up with it. If you raise the laptop to eye level and keep typing on its own keyboard, your wrists bend up at a harsh angle, and you've moved the strain from your neck to your forearms. I learned this the hard way, and it took me about two days to admit the stand was right and my typing setup was wrong.
The answer is an external keyboard and mouse. The laptop becomes just a screen, and the keyboard sits flat on the desk so your elbows rest at about 90 degrees, forearms parallel to the floor, wrists straight. I use a plain external keyboard I've had for years, nothing fancy, and it turned the whole setup from a compromise into something that actually works. Your wrists will thank you by the end of the day, even if it feels strange for the first hour.
If you don't have an external keyboard yet, you can still use the stand, but raise it a bit less and accept the compromise. The screen won't be perfect, but it will be better than before. In my experience, the external keyboard is the piece that makes the whole setup work, so if you're buying one thing to go with the stand, that's it. A cheap one is fine. The height of the screen does the heavy lifting.
Step 5: Set the tilt, check the glare, and give it a week
The Nulaxy also lets you adjust the angle of the screen. Tilt it back slightly so you're looking at the display fairly directly instead of at an extreme angle. Then check for glare. Where is your light coming from? A window behind you will put a reflection right on the screen no matter how high the stand goes, and overhead lights can do the same thing depending on where the desk sits. Move the stand a few inches, tilt the screen, or lower the blinds a bit. If your desk is near a window, try putting the stand so the window is to the side instead of behind you. That one change, moving my desk a quarter turn in the spare bedroom, did more for screen comfort than any other adjustment I made.
Then the most important step: don't judge the setup on day one. Your neck and shoulders have been compensating for years, and they won't unlearn that in an afternoon. Give it a week. If something still bothers you after a week, change one thing at a time, height or tilt, never both at once. That way you know which change actually helped, and you're not chasing your own tail.
And if you have real pain, please check with a doctor or physical therapist. I'm not either one. I'm just someone who spent 26 years leaning over patients and finally got her own screen height right. The stand fixed the part of the problem I could control, and that's worth doing, but it's not a substitute for actual medical advice if you need it.
What Else Helps
The stand fixes the screen height, but it can't fix sitting still for three hours. I set a timer on my phone, but a kitchen timer works just as well. I stand up every hour, even if it's just to walk to the kitchen and back. The tight spot between my shoulder blades shows up less often when I move, and it never fully goes away when I don't. Movement is the part of posture that no piece of equipment can do for you.
A couple of other things helped me: a doorway stretch for the chest, since rounded shoulders come from the front, and checking my chair height. If the chair is too low, you'll reach up for the keyboard. If it's too high, your feet won't sit flat. The stand works best when the chair is right underneath it, so take five minutes to adjust the chair before you blame the screen.
Distance matters too. The screen should sit about an arm's length away, and it should be easy to read without leaning forward. If you find yourself squinting and leaning in, the stand height isn't the problem. The screen is too far, or your glasses need a check. I moved my desk setup a few inches closer and stopped leaning entirely.
I'll also tell you the honest part: I still slouch in my recliner at night. The stand fixes the desk, not my entire life. But the desk is where I spend real hours, and fixing the desk fixed the worst of the afternoon ache. That's the standard I'd hold any setup to, including this one: it doesn't have to be perfect, it just has to be better than what you were doing.
Close your eyes, let your neck relax, open them. If your gaze doesn't land on the top third of the screen, the stand is at the wrong height. That one test did more for me than any stretch I've tried.
The Bottom Line
The whole setup comes down to three things: the top of the screen at eye level, your elbows at about 90 degrees, and your feet flat on the floor. The Nulaxy stand handles the first one, and it does it without taking over the desk, since it folds flat when you're done. Six weeks in, I can tell you it's not a cure for everything. But the screen height was the part I could control, and now it's the part I don't think about.
If you're still reading this and you haven't measured your own screen yet, that's the step to take tonight. Sit down, look straight ahead, and notice where your eyes land. Then decide whether your laptop is meeting you halfway or making you do all the work. Most people already know the answer before they finish the sentence.
The Nulaxy isn't the only stand on the market, and I'm not going to pretend it's the only one worth considering. What I can tell you is that it did the job I asked of it, it still looks the same as the day it arrived, and six weeks later I don't think about it, which is exactly what I wanted from a piece of desk equipment.
Set it once, then stop thinking about it
The Nulaxy Fully Adjustable Laptop Stand is the tool I used for this setup, and it's still on my desk six weeks later. If your neck is tired of meeting your laptop halfway, check today's price on Amazon.
Amazon Check Today's Price on Amazon →